
Things to consider before constructing your shed
Start by checking whether any permissions or checks are required. In some situations, outbuildings may need to comply with planning rules or other regulations, so it is worth confirming this before any work begins. Fountain Timber’s advice centre includes guidance on outbuildings and planning, and on constructing a suitable base.
Look for any underground utilities or drainage that could be affected by the shed base. If the building will sit near a house, wall or boundary, plan the roof so that rainwater runs away from the property rather than towards it.
Clear the area where the garden shed will stand, removing grass, plants, rubble and roots. Mark out the footprint of the building with pegs and string so you can visualise the overall size and position. At this stage, it is also worth checking that the proposed height of the shed will not obstruct your own view or significantly affect your neighbours.
Tools required
Gather the tools specified in your shed’s assembly instructions. As a minimum, you are likely to need a spirit level, tape measure, string line, plumb line, screwdrivers, hammer and a suitable tool for digging or setting posts if required.
Lay out all the supplied panels, floor and roof sections, and fixings so that you can easily identify each piece. Check you have everything you need before you begin. Wear suitable protective clothing, including sturdy footwear, work gloves and eye protection where appropriate.
Standard shed fixing kit
A typical fixing kit for a standard shed will include everything needed to assemble the structure and fit the roof covering, door and windows.
As a guide, you can expect to find 50 8 x 2½ screws (60 mm), 100 grams of 40 mm galvanised nails, 200 grams of 13 mm galvanised felt (clout) nails and 18 25 mm galvanised nails for securing the window beading.
Hardware usually includes three 200 mm light tee hinges, one door bolt, two galvanised turn buttons and 27 8 x 1 inch screws for the hinges, bolt and turn buttons. The kit will also contain four M6 x 60 CSH bolts with nuts and washers for fixing the door bolt, an instruction sheet and a tube of silicone sealant for the windows.
For a double door shed, the contents are the same, with an additional set of 27 8 x 1 inch screws, a second door bolt and four more M6 x 60 CSH bolts with nuts and washers.
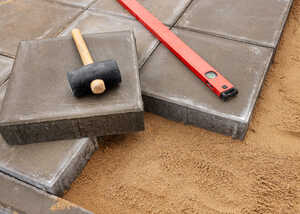
Preparing a suitable base
Every shed needs a firm, level base. This supports the building, ensures the doors and windows operate correctly and reduces the risk of movement over time. A base that is not level will quickly cause problems with the roof and wall alignment during assembly.
Construct the base in line with Fountain Timber’s guide on shed bases, making sure it is slightly larger than the shed floor but not so large that water can pool around the perimeter. Concrete, slabs or similar stable materials are normally recommended. The finished surface should be flat, level and clear of debris.
Once the base is ready and completely set, you can begin assembling your shed.
Step-by-step: constructing your shed
Step 1: Position the floor
Place the floor sections on the prepared base. The floor is supplied treated and has floor joists or battens running along its underside at roughly 350 mm centres. On pent sheds it is important not to confuse the floor with the roof, as the roof panel is larger than the base.
If your shed is a larger model, the floor may be supplied in more than one section. Butt these sections together as tightly as possible, placing the straightest edges next to each other so you achieve a neat, solid joint.
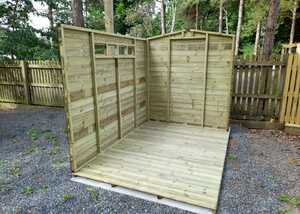
Step 2: Assemble the wall panels
Take one end panel and one side panel and stand them on the floor, with the lip on the lower edge of the panels overhanging the floor. Check that the panels are level and aligned with each other, then screw them together through the framing.
Continue placing the remaining side and end panels one at a time, fixing each new panel to the one beside it. Once all the wall panels are connected, walk around the shed and make sure they sit squarely and evenly on the floor, with no obvious twists.
When you are happy with the alignment, fix the walls to the floor by screwing through the lower battens or framing into the floor joists. Use 60 mm screws on the apex or pent end sections and on the sides, aiming for the floor battens beneath, so you get a secure fixing.
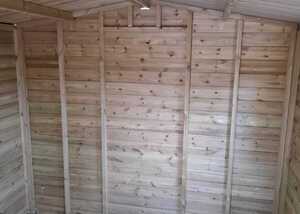
Step 3: Fit the roof structure
On apex sheds 2.4 m wide and over, you will usually be supplied with a roof truss made from ply, 100 x 50 mm or 75 x 50 mm timber. This sits in the apex of the shed to support the roof and prevent sagging. A timber support piece is normally fitted inside the apex end to carry the truss.
Position the truss on this support and secure it by driving 60 mm screws from the outside, taking care not to split the timber at the ends. The notches in the roof panels, between the cross beam and the edge, are designed to allow the roof to sit neatly over the end sections.
Step 4: Fix the roof panels
On larger sheds where each side of the roof is supplied in two sections, position the first roof panel so that it sits centrally over the shed and lightly tack it in place. Offer up the second roof panel, making sure it lines up with the first. Join the two roof sections by screwing through the centre battens of the roof panels at an angle. It can be awkward, so it helps to keep the screws as low as possible on the batten.
If you struggle to get the two roof sides to sit square with each other, the base is often the cause. Lift one corner of the shed slightly and watch how the roof responds. When lifting a corner improves the alignment, pack beneath that corner of the base until the roof sits correctly.
Once the roof panels are aligned, fix the roof down onto the shed by screwing through the roof boards into the tops of the side panels at roughly 600 mm intervals, again using 60 mm screws. Try to line up these fixings so they pass into the vertical battens inside the wall panels for maximum strength.
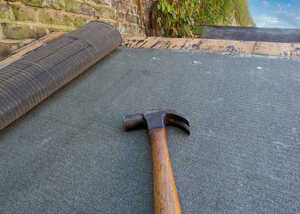
Step 5: Felt the roof
Cut the roofing felt to length so that each strip is around 125 mm longer than the roof section it will cover.
For 1.2 m and 1.5 m apex and pent sheds you will usually need two lengths of felt. For 1.8 m to 2.4 m apex and pent sheds, you will need three lengths, and for 2.7 m and 3.1 m models you will need four.
Lay the felt horizontally. On apex sheds, start from the lower edges on each side; on pent sheds, begin at the lower edge of the single slope. Use a few clout nails to hold the first strip in position, then overlap the next strip above it. On an apex shed, the final strip runs over the ridge; on a pent shed, it is laid along the highest point at the back or front, depending on the design.
Secure the felt with galvanised felt nails or clout nails at roughly 150 mm intervals. Drive the nails in squarely and take care to nail into the roof boards rather than into any gaps between them. If you do miss a board, remove the nail and seal the hole with mastic to maintain a watertight finish.
At the edges, bend the felt down over the sides of the roof, neatly cutting at the corners so that it folds cleanly, and nail it off to secure.
Step 6: Fit fascia boards and corner trims
Nail the fascia boards in place once the felt is secure. Apex sheds are usually supplied with four fascia boards – one for each gable end at the front and back, often requiring the angles to be cut to match the roof pitch. Pent sheds normally have three fascia boards: one along the high side and one on each end.
After fitting the fascias, fix the corner strips to cover and protect the external corners of the shed. If any of the side walls are made from more than one panel, additional cover strips will be provided to conceal the vertical joins where the panels meet.

Step 7: Door and ironmongery
On shiplap sheds, the door is screwed directly onto the cladding. Start by fixing the hinges to the door itself, making sure they are square and aligned with each other. Use 25 mm screws for this.
Position the door in the opening as high as possible, with an even gap on both sides. When you are satisfied with the positioning, screw the hinges to the shed frame or cladding using 25 mm screws.
Fit the pad bolt or door bolt in line with the instructions supplied, again using 25 mm screws, and secure it with the M6 x 60 bolts, nuts and washers provided where required.
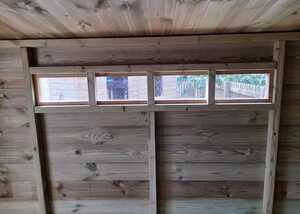
Step 8: Fit the windows and beading
Insert the glass into the window openings from inside the shed, applying silicone sealant where specified to help seal the panes. Hold each pane in place and fix the timber beading around it, nailing the beading carefully with the 25 mm tacks or small galvanised nails supplied. Work methodically so each pane is fully supported on all sides.
Finishing touches and ongoing care
Once your shed is fully assembled, felted and glazed, you can add shelving, hooks or other storage solutions to suit how you plan to use the space. It is a good idea to apply a suitable exterior wood treatment or paint, particularly on sheds that are not pressure-treated, to help protect the timber from weathering and keep it looking smart.
Periodically check the roof felt, door operation and any exposed timber for signs of wear or damage, and address any issues promptly. Simple maintenance will extend the life of the building and help you make the most of your investment.
Choosing the right shed from the Fountain Timber range
Fountain Timber offer a range of sheds so you can choose a style that matches your space and security needs.
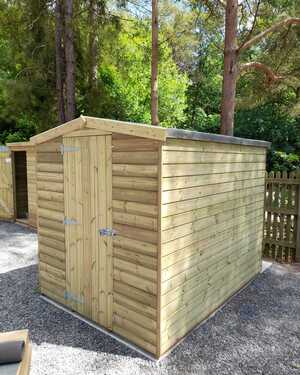
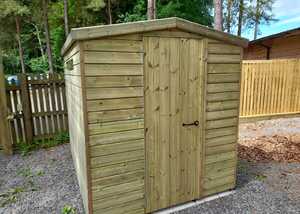
Standard Apex Shed
Standard Apex sheds are available in several sizes and are designed to meet a wide variety of storage requirements. Each shed is supplied with the required ironmongery, and both the floor and roof sections are produced using tongue and groove boards for strength and durability.
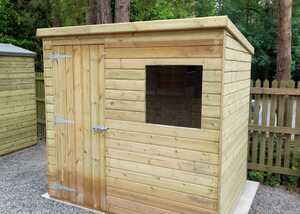
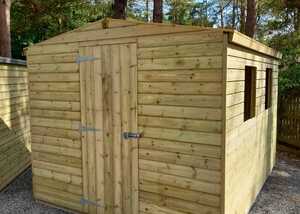
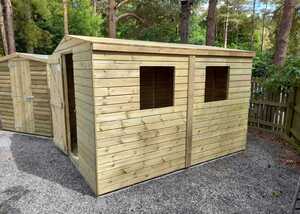
Standard Pent Shed
Standard Pent sheds provide a practical alternative where height or position is more constrained. The sloping roof runs from front to back, so the shed can sit close to a wall or fence while still shedding water effectively. A window allows natural light inside, and all ironmongery is included.
Security Sheds
The Security Shed is designed for customers who want extra protection for valuable garden equipment. The shed is produced using pressure-treated shiplap for extra strength and durability. Security features include a continuous hinge along the full length of the door, a high-quality six-pin barrel throw lock mechanism.

Powersheds
Powersheds are a highly flexible, modern approach to garden buildings. They are available in a variety of sizes and styles – and, as they are supplied as modular panels, it's possible to configure the layout to suit any number of garden requirements. This level of adaptability is particularly useful in smaller or awkwardly shaped gardens.
Build your shed with Fountain Timber
These instructions cover the majority of sheds that Fountain Timber manufacture and supply. If your building is a little different, the main principles of a firm level base, accurate panel alignment, secure fixings and careful roofing still apply. If you have any questions at any point, you can call the Fountain Timber team on 01934 862710 and they will be happy to help.
The information and advice in this article is provided in good faith and is designed to give general information and guidance. Any reliance you place on such information is therefore strictly at your own risk. If in doubt, we strongly recommend seeking professional assistance.
If you need further advice with your purchase, please do get in touch and we will be happy to help.